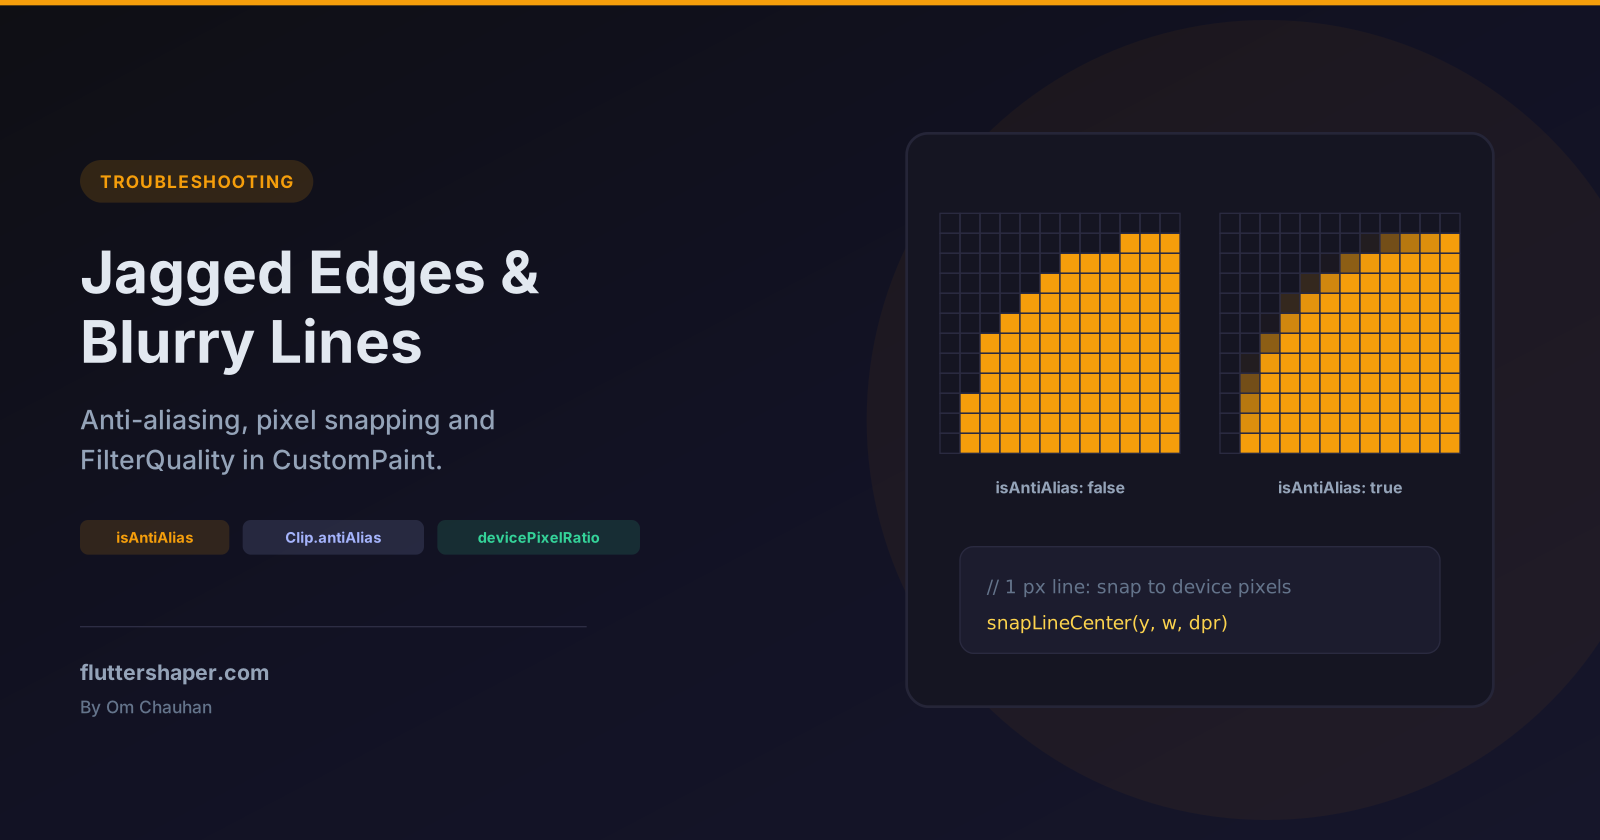
Fix Jagged Edges and Blurry Lines in Flutter CustomPaint
Custom painting produces two opposite complaints. Edges look too sharp: curves turn into staircases. Or lines look too soft: a 1 px divider comes out as a 2 px grey smudge. Both come from the same place, the moment a vector shape is turned into a grid of pixels.
The images below are real renders from widget tests; the first two are magnified 12× so you can see individual pixels. The coverage arithmetic (which pixels a shape touches, and by how much) is the same everywhere; the exact shading on a device depends on its renderer.
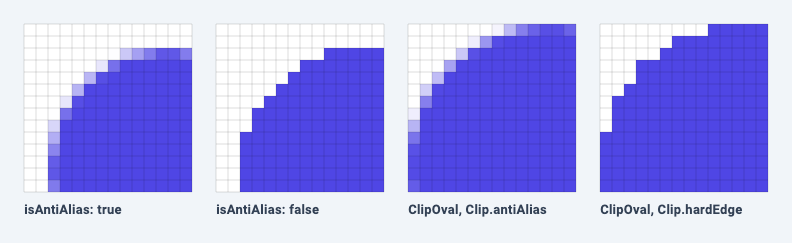
Magnified 12×: the top-left corner of each 24 × 24 render, one square per pixel.
Quick diagnosis
| Symptom | Likely cause | Fix |
|---|---|---|
| Staircase edges on a painted shape | Paint.isAntiAlias = false |
Leave it at the default, true |
| Staircase edges on a clipped widget | Clip.hardEdge |
Clip.antiAlias |
| Faint line between two shapes that touch | Both edges are anti-aliased | Draw them as one path, or overlap them |
| 1 px line looks 2 px wide and grey | The line is centred on a pixel boundary | Snap it to device pixels |
| Outlines get thick when you zoom | canvas.scale scales strokeWidth too |
strokeWidth = 0 (hairline) |
| Scaled image is blocky or shows false stripes | Paint.filterQuality defaults to none |
FilterQuality.medium |
| Exported image is blurry | toImage defaults to pixelRatio: 1.0 |
Pass the device pixel ratio |
Jagged painted edges: isAntiAlias
Anti-aliasing shades each edge pixel by how much of it the shape covers. A pixel half inside the circle gets half the colour. Without it, every pixel is either fully in or fully out, and curves become steps (the second panel above).
Paint.isAntiAlias defaults to true, both in the dart:ui docs and in a test. If your edges are jagged, look for code that turns it off:
class DotPainter extends CustomPainter {
  const DotPainter({this.antiAlias = true});
  final bool antiAlias;

  @override
  void paint(Canvas canvas, Size size) {
    final paint = Paint()
      ..color = const Color(0xFF4F46E5)
      ..isAntiAlias = antiAlias; // true unless you change it
    canvas.drawCircle(size.center(Offset.zero), size.shortestSide / 2 - 2, paint);
  }

  @override
  bool shouldRepaint(DotPainter oldDelegate) => oldDelegate.antiAlias != antiAlias;
}
In a test, the anti-aliased circle has partly covered pixels along its edge and the other one has none.
The one place anti-aliasing hurts: seams
Anti-aliasing has a side effect when two shapes share an edge. Split a square into two triangles along its diagonal and paint both in black: each triangle covers the diagonal pixels about halfway, and two half-covered layers don't add up to a solid pixel. In a widget test, the diagonal pixels come out at an alpha of 192 out of 255, a visible light line through a shape that should be solid. With isAntiAlias = false, every pixel is 255.
Turning anti-aliasing off removes the seam but brings back the staircase on the outer edges. A better fix is to draw adjacent pieces as a single path: in the same test, putting both triangles in one Path and drawing it once leaves every pixel at 254 or 255. Where that isn't possible, overlap the pieces slightly so the shared edge is fully covered.
Jagged clip edges: Clip.hardEdge vs Clip.antiAlias
Clipping has its own anti-aliasing switch, separate from Paint. The third and fourth panels in the image show an oval clip with each setting.
ClipOval(
  clipBehavior: Clip.hardEdge, // jagged: no anti-aliasing on the clip
  child: photo,
)
ClipOval(
  // Clip.antiAlias is already the default for ClipOval, ClipRRect and ClipPath.
  child: photo,
)
The defaults differ by widget, which is where surprises come from:
| Widget | Default clipBehavior |
|---|---|
ClipOval, ClipRRect, ClipPath |
Clip.antiAlias |
ClipRect |
Clip.hardEdge |
Container, Material |
Clip.none (you pick a value when you turn clipping on) |
Clip.hardEdge is fine for axis-aligned rectangles, where every edge falls on a pixel boundary anyway. The Flutter docs describe it as "a reasonable choice when clipping is needed, if the container is an axis-aligned rectangle or an axis-aligned rounded rectangle with very small corner radii." For anything curved or diagonal, use Clip.antiAlias. Clip.antiAliasWithSaveLayer is documented as much slower; reach for it only if you see the bleeding-edge artifacts the docs describe.
Inside a painter, the equivalent switch is a parameter on the clip call:
canvas.clipPath(shape); // doAntiAlias defaults to true
canvas.clipPath(shape, doAntiAlias: false); // jagged
Blurry 1 px lines: the half-pixel problem
A stroke is centred on the path. A 1 px line drawn at y = 10 therefore covers y 9.5 to 10.5: half of pixel row 9 and half of row 10. Anti-aliasing shades both rows at 50%, and you see a 2 px grey line instead of a 1 px black one.
class LinePainter extends CustomPainter {
  @override
  void paint(Canvas canvas, Size size) {
    final paint = Paint()
      ..color = Colors.black
      ..strokeWidth = 1;
    // Covers y 9.5 to 10.5: two half-covered rows, drawn 50% grey.
    canvas.drawLine(Offset(0, 10), Offset(size.width, 10), paint);
    // Covers y 20.0 to 21.0: one solid row (at devicePixelRatio 1).
    canvas.drawLine(Offset(0, 20.5), Offset(size.width, 20.5), paint);
  }

  @override
  bool shouldRepaint(LinePainter oldDelegate) => false;
}
A test reading the raw pixels confirms it: the first line leaves rows 9 and 10 at alpha 128 each, the second fills row 20 at 255 and leaves its neighbours empty.
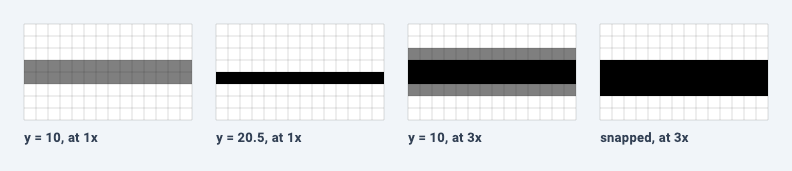
Magnified 12×. Each square is one physical pixel.
Logical pixels are not device pixels
The "add 0.5" trick is about device pixels, not logical ones. Flutter coordinates are logical pixels, and on a 3x screen a 1 logical px line is 3 physical pixels wide. At y = 10 it covers physical rows 28.5 to 31.5, so the top and bottom rows are half covered (third panel). y = 10.5 happens to be crisp at 3x as well, but a test shows it soft at 1.5x, where a 1 px line is 1.5 physical pixels wide and no position can make it crisp.
The general rule: both edges of the line must land on physical pixel boundaries. When the line is an odd number of physical pixels wide, its centre must sit in the middle of a pixel; when it's even, on a boundary. These two helpers handle any ratio (they need import 'dart:math' as math;):
/// [logicalWidth] rounded to a whole number of physical pixels (at least one).
double snapStrokeWidth(double logicalWidth, double devicePixelRatio) =>
    math.max(1, (logicalWidth * devicePixelRatio).round()) / devicePixelRatio;

/// Centre for a line of [strokeWidth] (already snapped) near [position], so that
/// both edges of the line fall on physical pixel boundaries.
double snapLineCenter(double position, double strokeWidth, double devicePixelRatio) {
  final physicalWidth = strokeWidth * devicePixelRatio;
  final firstEdge = (position * devicePixelRatio - physicalWidth / 2).roundToDouble();
  return (firstEdge + physicalWidth / 2) / devicePixelRatio;
}
snapStrokeWidth matters on fractional ratios. At 2.625, a 1 logical px line is 2.625 physical pixels, and no position can make both edges whole; it is rounded to 3 physical pixels instead. A grid painter that uses them:
class GridPainter extends CustomPainter {
  GridPainter({required this.devicePixelRatio, this.spacing = 20, this.snap = true});
  final double devicePixelRatio;
  final double spacing;
  final bool snap;

  @override
  void paint(Canvas canvas, Size size) {
    final width = snap ? snapStrokeWidth(1, devicePixelRatio) : 1.0;
    final paint = Paint()
      ..color = const Color(0xFF94A3B8)
      ..strokeWidth = width;
    double at(double v) => snap ? snapLineCenter(v, width, devicePixelRatio) : v;

    for (var y = spacing; y < size.height; y += spacing) {
      canvas.drawLine(Offset(0, at(y)), Offset(size.width, at(y)), paint);
    }
    for (var x = spacing; x < size.width; x += spacing) {
      canvas.drawLine(Offset(at(x), 0), Offset(at(x), size.height), paint);
    }
  }

  @override
  bool shouldRepaint(GridPainter oldDelegate) =>
      oldDelegate.devicePixelRatio != devicePixelRatio ||
      oldDelegate.spacing != spacing ||
      oldDelegate.snap != snap;
}

class Grid extends StatelessWidget {
  const Grid({super.key});

  @override
  Widget build(BuildContext context) {
    return CustomPaint(
      size: Size.infinite,
      painter: GridPainter(devicePixelRatio: MediaQuery.devicePixelRatioOf(context)),
    );
  }
}
The test renders this grid at ratios 1, 1.5, 2, 2.625, 2.75, 3 and 3.5. With snapping, no pixel is partly covered at any of them. Without it, every ratio except 2 has soft lines.
The catch: the widget itself must sit on a whole pixel
Snapping works in the painter's own coordinates, which start at the top-left of the CustomPaint. If the widget is laid out at a fractional position, every line moves with it. Layout does produce fractional positions: in a test, Center places a 51 × 51 box on an 800 × 600 screen at (374.5, 274.5), half a pixel off at 1x. When crisp lines matter, keep the sizes and paddings around the painter in whole physical pixels.
Hairlines: strokeWidth 0
Paint.strokeWidth defaults to 0.0, which the docs call "a hairline width". A hairline is always one physical pixel wide, whatever transform is applied to the canvas. A normal stroke scales with the canvas:
| Stroke | Under canvas.scale(4) |
Under canvas.scale(0.25) |
|---|---|---|
strokeWidth = 1 |
4 px wide | A quarter of a pixel (faint) |
strokeWidth = 0 |
1 physical pixel | 1 physical pixel |
Those widths come from measuring the total coverage of one pixel column in a test at a device pixel ratio of 1; the hairline under scale(4) was also measured at 3, where it is again one physical pixel. That makes hairlines the right tool for outlines and grid lines on a zoomable canvas:
class HairlinePainter extends CustomPainter {
  HairlinePainter({required this.zoom});
  final double zoom;

  @override
  void paint(Canvas canvas, Size size) {
    canvas.scale(zoom);
    final outline = Paint()
      ..style = PaintingStyle.stroke
      ..strokeWidth = 0 // hairline: one physical pixel at any zoom
      ..color = Colors.black;
    canvas.drawRect(const Rect.fromLTWH(10, 10, 40, 30), outline);
  }

  @override
  bool shouldRepaint(HairlinePainter oldDelegate) => oldDelegate.zoom != zoom;
}
Hairlines follow the same half-pixel rule as any other line. A hairline exactly on a pixel boundary is split across two rows at half strength each, which a test also shows.
Scaled images: FilterQuality
Vector shapes stay sharp under any canvas.scale, because the path is transformed before it is turned into pixels. In a test, a 2 px circle drawn under canvas.scale(16) produces almost exactly the same pixels as a 32 px circle drawn without scaling. Images are different: their pixels have to be resampled, and FilterQuality chooses how.
The trap is the defaults. Paint.filterQuality defaults to FilterQuality.none, which the docs describe as nearest neighbour. The Image widget and the paintImage helper both default to FilterQuality.medium. So an image that looks fine in an Image widget can look blocky when you draw it yourself with a plain Paint() (ui is import 'dart:ui' as ui;):
class ImagePainter extends CustomPainter {
  ImagePainter(this.image, {this.filterQuality = FilterQuality.medium});
  final ui.Image image;
  final FilterQuality filterQuality;

  @override
  void paint(Canvas canvas, Size size) {
    final src = Rect.fromLTWH(0, 0, image.width.toDouble(), image.height.toDouble());
    // A plain Paint() samples with FilterQuality.none (nearest neighbour).
    final paint = Paint()..filterQuality = filterQuality;
    canvas.drawImageRect(image, src, Offset.zero & size, paint);
  }

  @override
  bool shouldRepaint(ImagePainter oldDelegate) =>
      oldDelegate.image != image || oldDelegate.filterQuality != filterQuality;
}
Or skip the manual Rect maths and use the same helper DecorationImage uses, which also handles BoxFit:
void paintImageHelper(Canvas canvas, Rect rect, ui.Image image) {
  // paintImage (used by DecorationImage) defaults to FilterQuality.medium.
  paintImage(canvas: canvas, rect: rect, image: image, fit: BoxFit.cover);
}
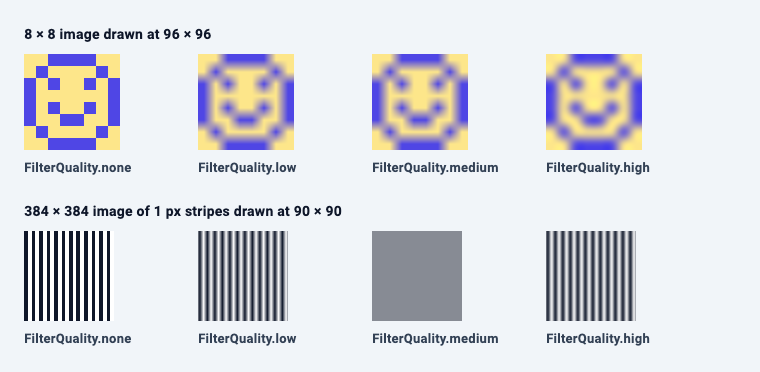
The two rows show different failure modes:
- Scaling up (top row, 8 × 8 to 96 × 96):
nonekeeps hard square pixels, which is right for pixel art and wrong for photos. The other three smooth them. - Scaling down (bottom row, 384 × 384 of 1 px stripes to 90 × 90):
none,lowandhighall show false stripes that aren't in the source. Onlymediumaverages them to an even grey; a test measures the spread of values across a row at under 10 formediumand over 60 for the others. This matches the docs:mediumuses mipmaps, andhigh"can be worse than medium" when shrinking below half size.
FilterQuality.medium is the safe default for photos and icons at arbitrary sizes. Use none only for pixel art scaled up by whole numbers.
Blurry exports: toImage and pixelRatio
When you export a widget with RenderRepaintBoundary.toImage(), the default pixelRatio is 1.0: one image pixel per logical pixel. On a 3x phone, that is a third of the resolution on screen, and the export looks soft. Pass the device ratio (RenderRepaintBoundary comes from package:flutter/rendering.dart):
Future<ui.Image> capture(GlobalKey boundaryKey, BuildContext context) {
  final boundary = boundaryKey.currentContext!.findRenderObject()! as RenderRepaintBoundary;
  // The default pixelRatio is 1.0: one image pixel per logical pixel, blurry on a 3x screen.
  return boundary.toImage(pixelRatio: MediaQuery.devicePixelRatioOf(context));
}
In a test with the default 3.0 ratio, a 100 × 50 boundary exports at 100 px wide with the default and 300 px wide through capture. The same applies when you record a Picture yourself: scale the canvas by the ratio before drawing, and pass the scaled width and height to toImage.
Related articles
Explore Our Projects
Beyond the shape tools — two more things we build and use every day. Free to try, no signup.
Keyboard Arena
Typing practice that plays like a game
Real-time WPM tests, mechanical switch audio, A-Z finger drills and 40+ structured lessons. Race a ghost of your best run instead of grinding random words.
- ✓ Live WPM & Accuracy
- ✓ Mechanical Switch Audio
- ✓ 40+ Guided Lessons
Flutter Log Explorer
Finally, Flutter logs you can read
Zero-config, real-time log capture from the Debug Adapter and Dart VM Service, with smart classification, filters and deduplication — all inside VS Code.
- ✓ Zero-Config Capture
- ✓ Smart Filters & Search
- ✓ Noise-Free Deduplication
Ready to Design Your Own Shapes?
Open the editor and start creating professional Flutter CustomPainter code visually.
Open the Editor